Git: How I use it and Why I don't use GitFlow
2017-07-12 — 12 min read git
As a consultant for the past several years, I’ve had the opportunity to work on many different types of software projects, including marketing sites, mobile applications, back-offices, libraries, and deployed applications, and every one of them has used git. For the most part, I can go with the (git)flow and get along with many merging strategies. However, when asked for my opinion, I almost always have the same advice, and it isn’t to use GitFlow.
I know two idioms that apply here:
When all you have a hammer, everything looks like a nail.
Use the right tool for the job.
If a single tool is built for all purposes, it’s going to fit about as well as a one-size-fits-all hat. There’s a few features I’m going to propose below that will complicate your software’s flow through git that aren’t necessary in all cases; if they don’t apply to you, don’t over-complicate it. However, you will be able to add them in later if you find you need that case.
An Overview
In this article, I’m using blue for feature branches, green for release branches, and orange for hotfixes. Your final structure may look something like the following:

- Feature branches (or bug fixes that aren’t targeting a released version) typically come out of a release branch and merge into a not-yet-released branch. They may be merged into (and branched from) other feature branches in special cases.
- Release branches have code that is available outside of the development/QA team. If you are running a project that only has one release planned at a time and you don’t support back versions, such as a small open-source library, you’ll only need one release branch.
- Hot fixes are branches pertaining to a particular already-released branch.
I’m using semver in this article, but there’s no reason you need to to follow that process; I’m more concerned about how code flows through git, not what you call it along the way.
But wait! This sounds a lot like…
I’ve done a fair amount of both research and experimentation. I know there’s a number of other processes that are similar to this, and again, many don’t have the easiest names to reference, and going through my old notes, many of the links are broken. Because this is not a new problem, there’s people who have built tools around parts of this workflow, too.
The Basics
Here’s a very simple story: three features are being added to the first release for the project.

First, we start with our release branch: in this case, master. Feature branches get branched from the commit that contains the code they’re based on (check out infrastructure branches below for clarification on that), and merged into the release line they’re targeted for. Once all the features are in, the branch gets tagged (the open dot on the above graph) with the full release version, and you’re off to the races. This extends nicely if you get more features before you have a release.

Here, we also merged master back to feature-b; this is not mandatory, and actually can cause issues if you either need multiple future releases or aren’t avoiding all the dangerous practices I list below. (That’s right, I’m putting the warning in the instructions rather than just at the end.)
If you have QA testing feature branches, they can verify each just before it is merged, or test only the release branch before it is tagged; the option is left up to your own team.
Incremental Features and Infrastructure Branches
Incremental features are features that build upon previous features; they are a common staple of an agile environment. Outside of agile, waterfall shops still have them, but sometimes just associate them with one big feature. These can be split up into smaller features that depend upon one another; this even happens in agile, sometimes within a single sprint. When one feature is not quite done, but another developer is ready to start on a dependent feature, you don’t want your resources blocked: you want an incremental feature branch.
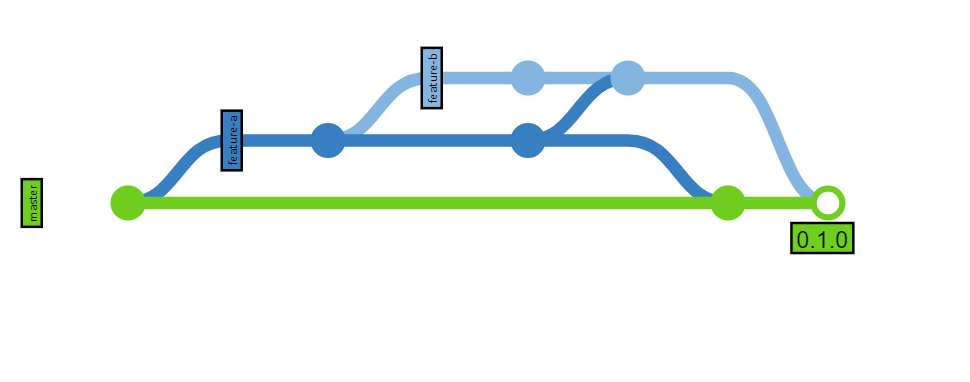
Here, Feature B depends on Feature A, which isn’t done yet, but is complete enough for Feature B to start being worked on. As more progress is completed on Feature A, it gets merged into Feature B as needed.
Infrastructure branches work similarly, except they never get merged directly to a release branch; they only get consumed through features that need them. That’s because often developers will need a piece of infrastructure to complete several tasks, but the infrastructure provides no business value other than that, and can’t be QA tested on its own. As a result, infrastructure can look like this:
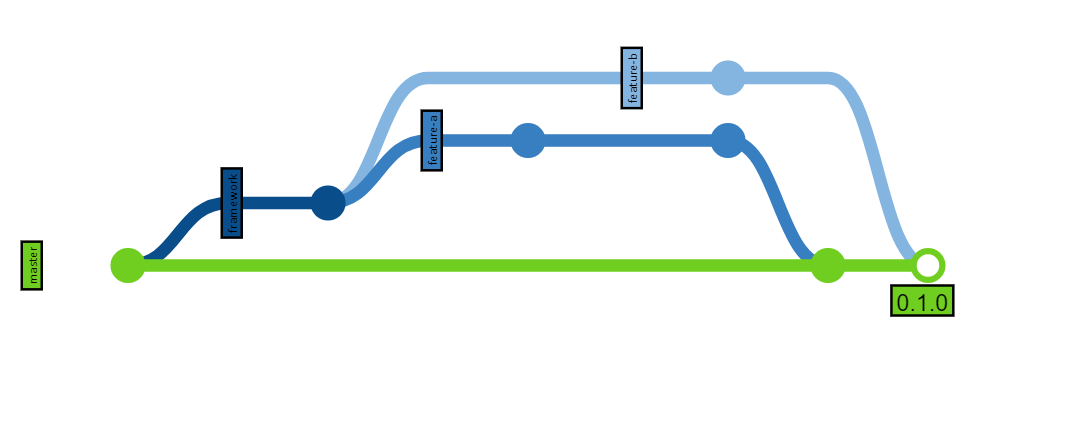
Pretty much the same as an incremental feature
This process keeps commits off of the release branches that don’t pertain to a specific feature, keeping QA and overcontrolling managers happy. You also can then be sure that every feature branch merged into the release is familiar enough to management to be able to write release notes when the time comes.
Maintaining Multiple Releases
To support multiple releases, you’ll have multiple release branches. There are a couple nuances here, including multiple future releases and multiple back releases; I’m going to describe multiple back releases below, and touch lightly on multiple future releases.
Cutting a Release
Once you’ve tagged the release, it’s time to start building your next release. Generally speaking, you can name the release whatever you choose ’ the branch names don’t mean anything to git, so they can be changed at any time. However, they might mean something to your tooling, or to your developers, so let that be your primary concern. Make a new branch from the release at that time.
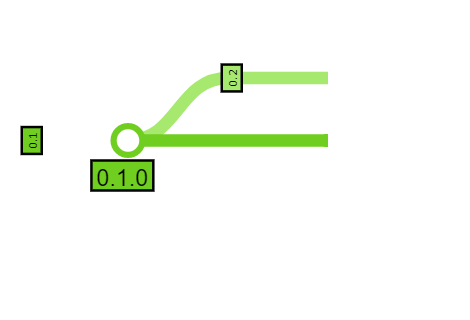
It’s really that simple. Rename the branch later if you want.
Note that it’s “0.1.0”, the tag, that is actually released; the new branch has no tags, and so therefore is not yet released… but it is targeted as the next release. Any features outstanding can now be merged into the new release line.

Note that other than making a new release branch, this is identical to our three-feature diagram above. As a result, conflicts remain minimal.
A variant is to always call the latest release line master and create new branches for older releases; I personally dislike this because it causes a slightly different development flow when getting close to a new release and for those times when you don’t want a feature to accidentally go with an earlier release. However, it does reduce cognitive load on devs, and can be done just before a release tag to start a feature freeze.

Hot fixes
As soon as you have back releases, you’re going to need to patch those back releases.
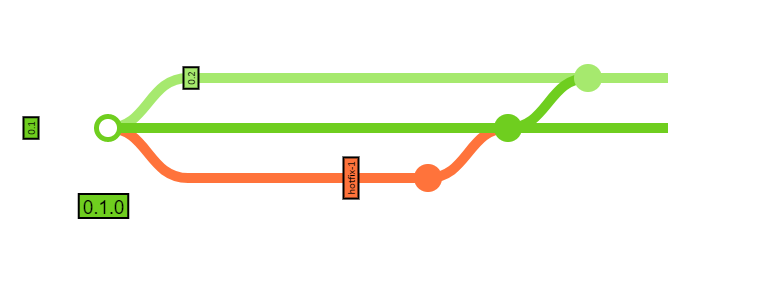
The hotfix gets branched from the oldest release where the patch needs to be applied, then merged back into that same release line. Note that the release lines are kept up-to-date with older lines. This can even be automated. Doing this in every case will make sure the hotfixes are applied in future releases. If the code has been refactored away, don’t panic even though it’ll definitely give a merge conflict. (Merge conflicts are normal and beneficial; it’s the ones that sit and fester that become problematic. If it hurts, do it more often.) However, the merge conflict will be easy to resolve as you can keep the newer release and merge in the hotfix’s merge with no changes ’ this will keep the tree clean and reliably allow you to keep merging hotfixes forward.
Antipattern: Merge to each release rather than propagating releases
A common mistake I keep seeing in development teams (and have experienced on previous projects, which is why I know it’s a mistake) is to merge the hotfix to each release line that it applies to rather than always merging from the parent release. For instance:

This is bad!
Why is this bad? 0.1.1 was not in 0.2 before, but it gets merged into 0.2 with hotfix-2. If there were serious merge conflicts with hotfix-1 like we described above (the code was moved away), we’d need to handle that again when we do hotfix-2, without the clarity of it coming from the original hotfix-1. On top of that, it could be months away, with a change in the dev team!
Git is built specifically to handle these cases better than the preceding versioning systems. So, please make sure your hotfix tree looks like this:

Multiple Future Releases
There comes a time in many projects where you’re planning for multiple future releases. Whether you’re cramming on doing some polish for a demo at a conference or working on a day-of-Black-Friday-only promotion, there are times where even the smallest teams plan for two future releases at a time. Doing this requires a number of changes, and since this article is getting long, I’ll post a follow-up.
Practices to Avoid
Mostly, avoid practices that rewrite history. Git is a multi-branching tool; when you pull a repository local, you’ve actually created dozens of branches already. Rather than trying to keep the commit history linear, embrace the multi-branching and use the inbuilt graphs in whatever tool you enjoy most.

That’s right, I use TortoiseGit.
Learn to understand the various merges and branches and you’ll be a lot happier. In this case, I really only need to look at the black squares for the actual merges for release notes, so long as each feature branch was named in a helpful way.
More importantly, this isn’t just a personal preference: there are problems that come with the various techniques when using the branching mechanisms I describe above.
Rebase Merges
Moving all the commits to come after your parent branch’s latest commit makes your history linear and rather easy to read. However, it rewrites history in such a way that it becomes destructive to future merges in the case of a shared history.
Taking our infrastructure branch example, let’s add an extra commit that conflicts with Feature A to the release. A common practice is to pull the target release into the source branch as follows:
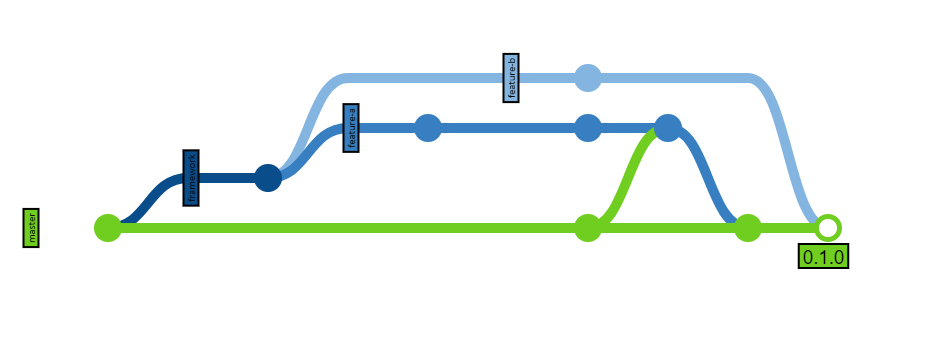
If the developers on Feature A choose instead to do a rebase, because the framework branch has not made it into master yet, it looks as follows.

This will cause Feature B to have conflicts because the work will have been re-done in Feature A, rather than re-used. (Note that git is pretty smart and you won’t get this in trivial cases. But if Feature B needed to change the infrastructure at all, git may suggest changing it back.) Again, this resolution will fall on the feature-b developers, and won’t be clear if they weren’t intimately familiar with the framework code as a whole.
Antipattern: Cherry Picking as an alternative to Merging
Cherry picking is another way to rewrite history. I’m not saying that all cherry-picking is bad: sometimes you have a partly good feature branch but it has a few bad commits. Rather than keeping them in the branch, you can cherry-pick the commits into a new branch that then gets merged, but (and this is important) then you throw away the old branch. Two commits that do the same but from different timestamps cause many issues.
Let’s look at the hotfix example, with cherry-picking.

Cherry picking is like redoing the work!
In this case, hotfix-1 again didn’t apply to 0.2, so it was left out, saving a bit of work. However, after that, we needed to create a branch, cherry-pick out the changes, and re-apply them. Cherry-picking is an error-prone process, and will force you to resolve the same conflicts multiple times ’ and even if the same developer is doing it, is prone to mistakes. While your QA team (if they’re good) will want to test every version the fix is added to, you’ll quickly find that the slight variations in the resolutions will introduce other issues, (though git rerere can help you prevent those slight variations), and it’ll be difficult to track if a particular hotfix has been applied to a given release line, especially as you add more release lines.

If you really get into minimizing merges, your tree would look like this.
Again, git is specifically built to handle merges more safely than its predecessors: use the tool you’ve chosen! The safest way to handle it:

Don’t forget that the extra merges can be automated!
Don’t use GitFlow
GitFlow has several good things going for it: it’s familiar to almost all developers and is quite well documented. There are tools that help you follow it, and it is particularly well tailored to git.
Unfortunately, there is one issue that I’ve run into with it no matter the project: the develop branch. Having code in a common place where it’s not fully tested and not necessarily working towards a feature that is to be released ends up being a ghost town of half-completed architectures and not-released features if the team is ever busy. When the team gets large, the develop branch gets rather noisy; it becomes easy to let things slip into production and miss the release notes, and in places where project’s owner wants to control every detail, this becomes a real problem. Fortunately, I’ve found that develop itself is not necessary to the core concepts of GitFlow; that’s actually where I started customizing the system.
The other gap that I’ve found with GitFlow is that it doesn’t provide support for old release versions. That is, once you cut release v1.2, you can no longer patch v1.1. In many situations, this is not a big deal: most projects don’t need to support back versions. However, with a deployed application, you may not have the luxury of being an “evergreen” project, and you may even need to go back and patch security holes in versions that have long since passed their end of life. Interestingly enough, the mechanism for maintaining old release lines came from an older Microsoft TFS training session I had ’ they, however, were pitching it as standard for our marketing site, so our team didn’t adopt that at the time.
Thanks for Reading!
I hope you enjoyed learning about this workflow! I’m always interested in hearing stories about other successful (or failed) approaches, so feel free to share your own processes and what has worked for you.
Special thanks to the GitGraph.js project for being around so I could make these graphs easily.
